Sunday, September 21, 2014
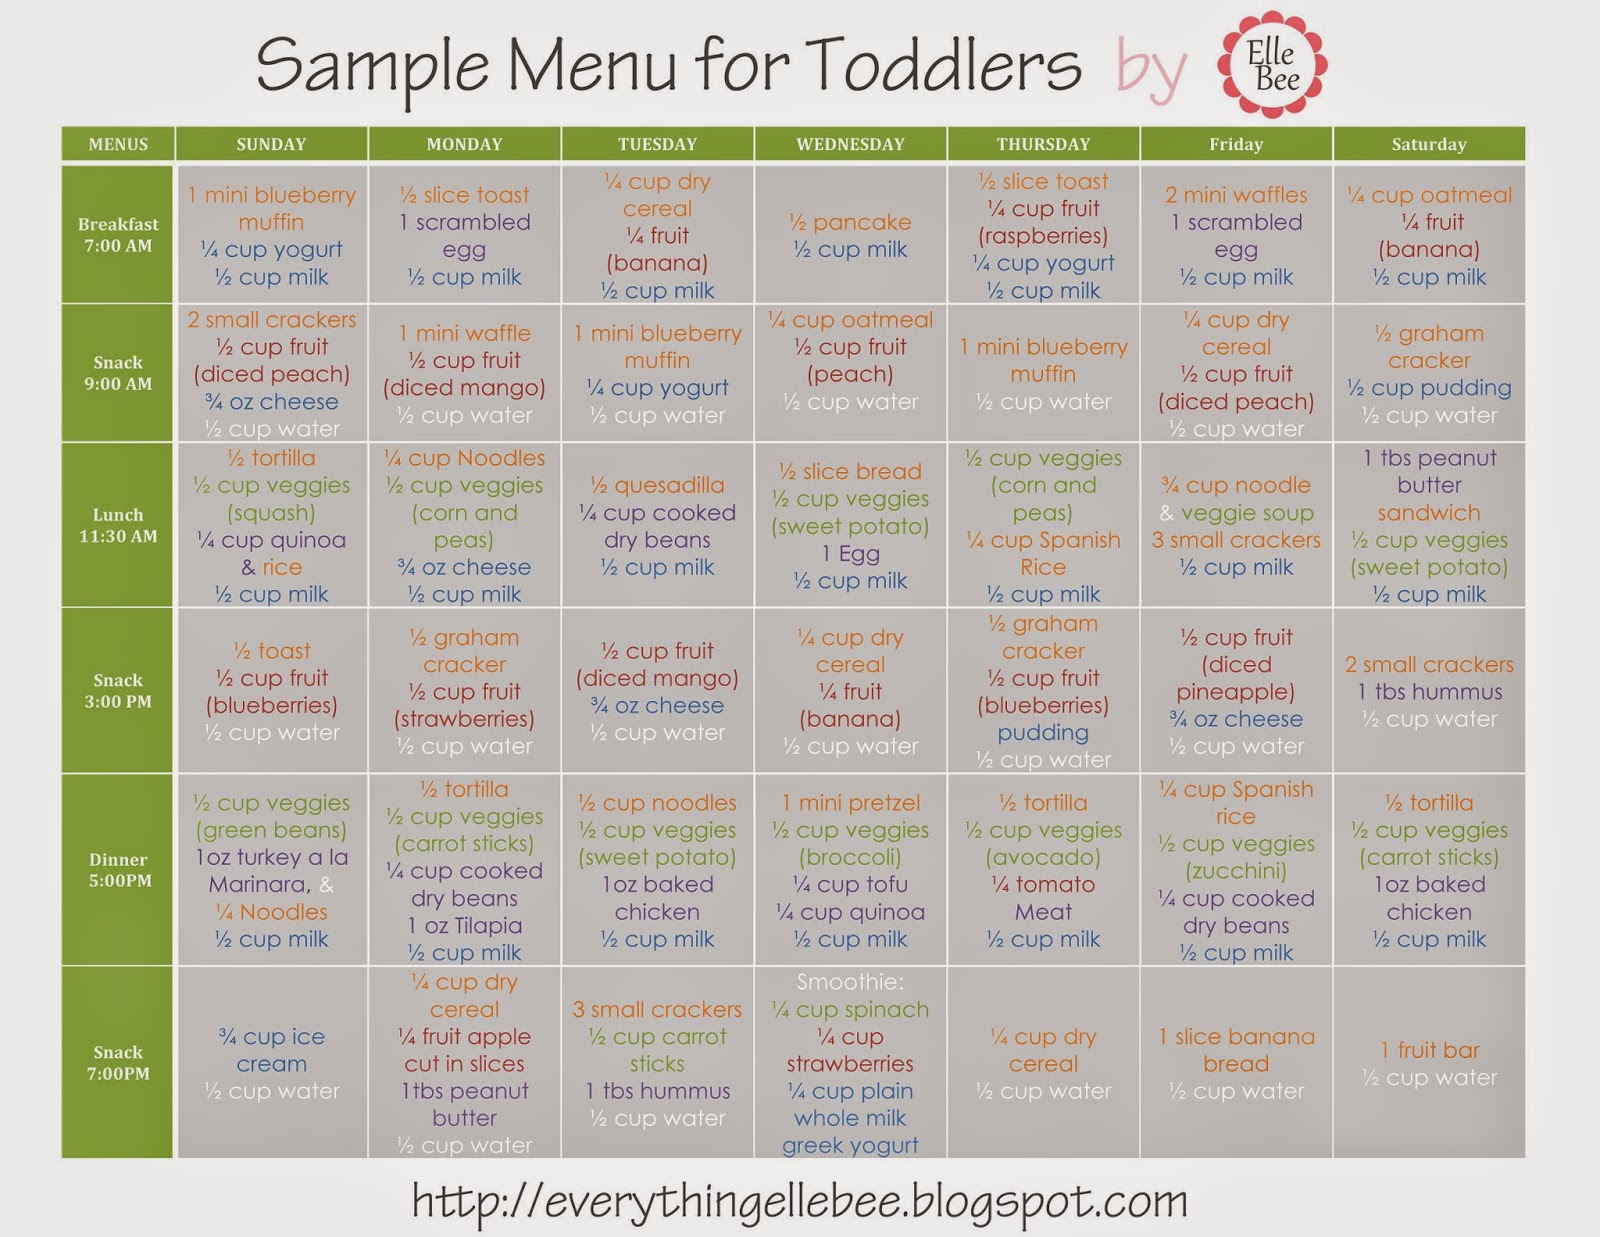
Free Sample Menu for Toddlers (Ages 1-3)
"Tiny Bit" is eating more solids so we decided it was time to put a menu in place.
An organized home makes life so much easier...
Here is baby's menu for the week...
Disclaimer: I’m not a doctor nor a registered dietitian. The purpose of this blog is to share my experiences with you. When it comes to your health and fitness, please consult your physician.
I used the following guidelines to create this menu:

Best,
Friday, September 19, 2014
FREE Printable Farm Animal Template for Felt Board
I searched everywhere for an animal template that I could use to make felt animals for Baby's felt story board AND nothing came close to what I was picturing so I decided to make my own template... & now I'm sharing it with you for FREE:).
So far, I've only made the felt cow... but I'll get to work on the other animals soon.
When I'm done I'll post pictures along with directions and an edited version of this template.
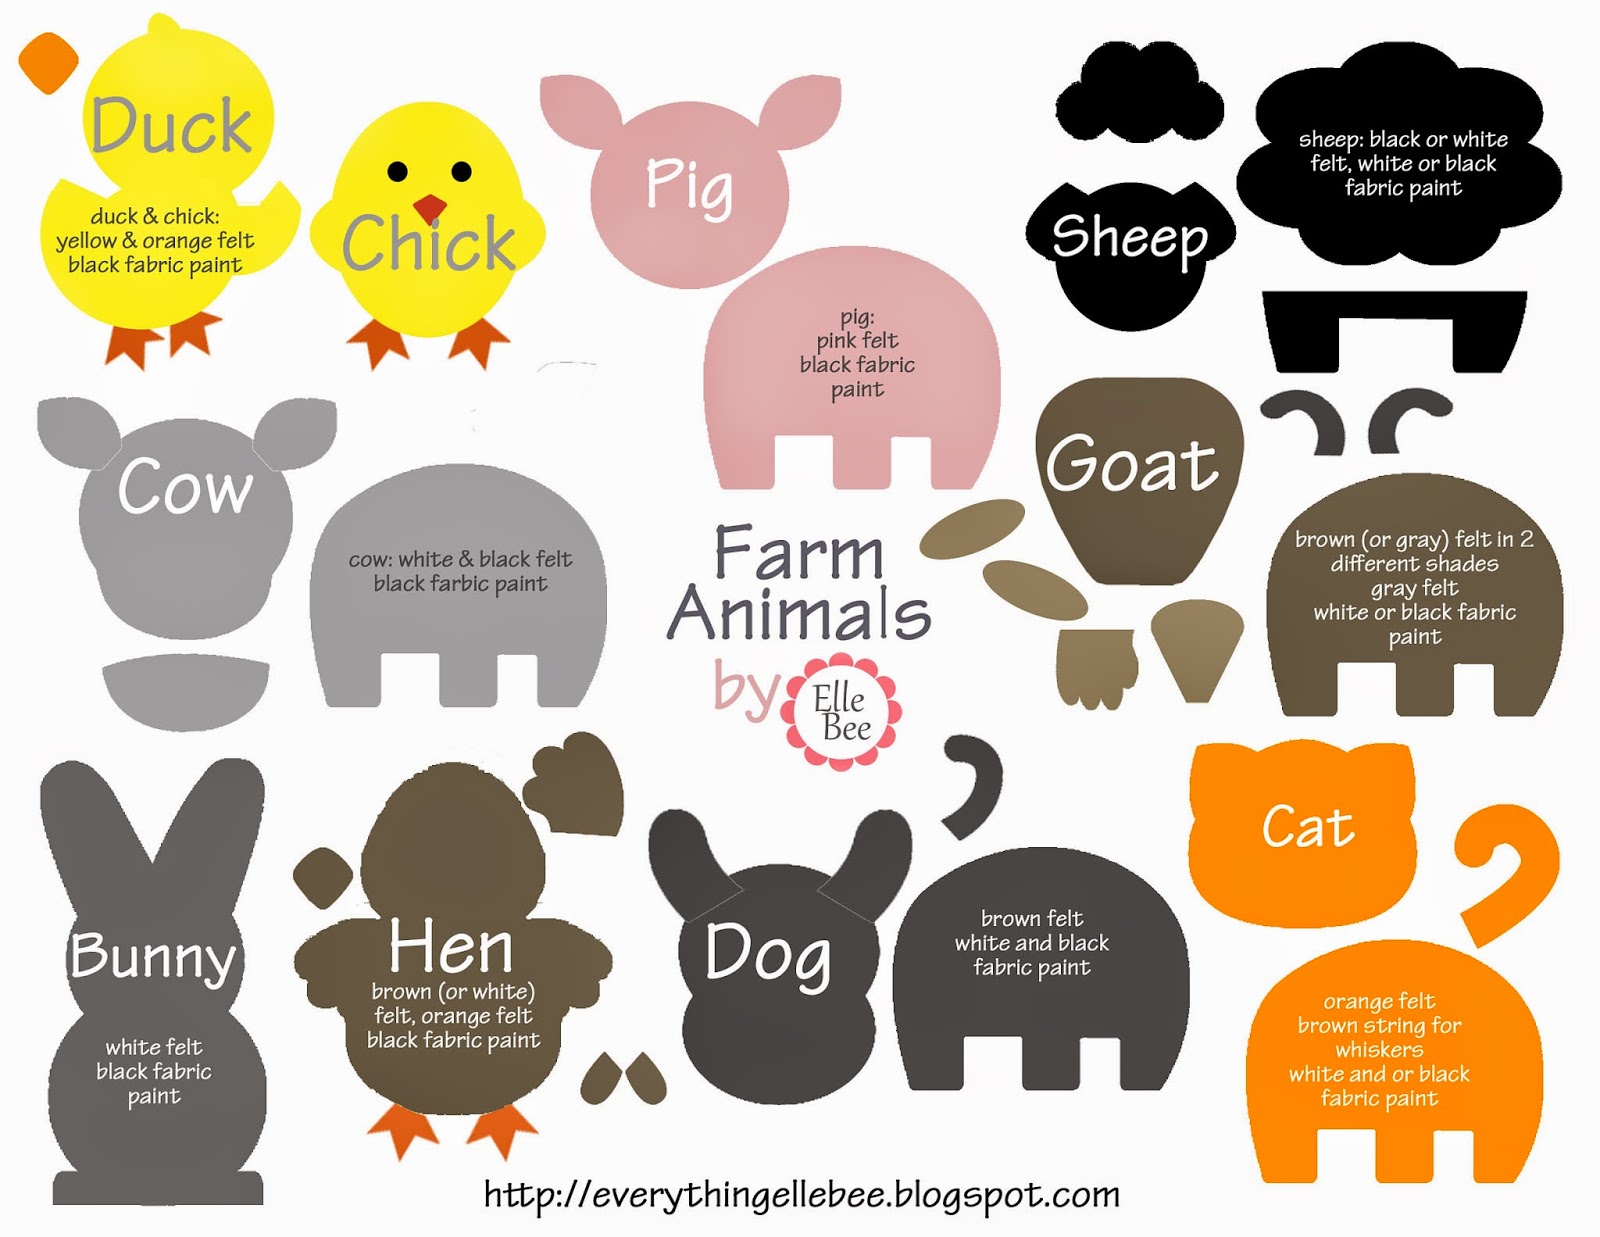
**Edits**
Hen - red felt
Sheep - pink felt for face
Pig- pink string for tail
Materials needed for this project:
-This template printed out on thin paper
-Felt Squares
-3D Fabric Paint for details
-String/Yarn for tails
-Fabric Pins
-Fabric scissors
-Fabric Glue -- I use tacky glue and mod podge
(all materials available at your local craft store)
COMING SOON:
Farm Animal Template Page 2 &
Safari Animal Template Page 1
Happy crafting,
Write a comment below if you would like to see more flannel story templates!
Sunday, September 14, 2014
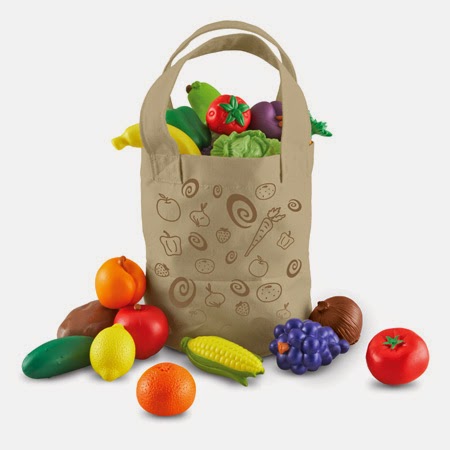
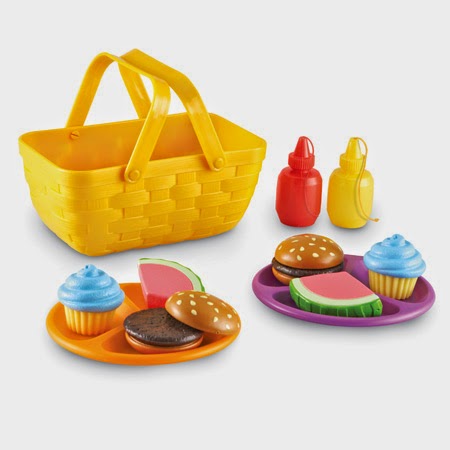
Farmer's Market Color Sorting Set Review
Okay, so a few weeks ago we made this awesome purchase for baby for only $20 on Amazon! (It usually sells for $40.)

Let me just say we love this set so much, I actually purchased a few other sets including:
I made the last three purchases on Zulily a few weeks ago (for almost half the regular price) but have not received them yet. (Zulily products take forever to ship... :/)
Anyways, here is my Farmer's Market Color Sorting Set Review
Product Logistics:
Farmers Market Color Sorting Set includes
- 25 foods ("Each food is relationally sized" to one another")
- 5 baskets (4"H x 5.5"D)
- stickers for labeling
- & an activity book
Recommended for ages 3+
Price: $39.99
|
| Farmer's Market Color Sorting Set |
When & why I made this purchase:
I made this purchase a few weeks ago (after tons of research) for my daughter (10 months). The recommended age for this product is 3+ but I took the risk knowing that my daughter needed play food for her kitchen. I could have easily purchased felt play food or any other soft play food but I wanted to invest in something that would last longer.
What we DO like about this purchase:
-Perfect for small hands.
-The quality of the food is great.
-It seems like the each piece will be able to last a really long time.
-Each piece has awesome detail, and is relationally sized to one another. In other words, the pumpkin is the largest and the berries are the smallest.
- Perfect for our daughter who is only 10 months old.
- The price I paid ($20) was great for the quality of food and amount of food included.
What we DON'T like about this purchase:
I would have preferred that the baskets be made out of real wood.
Would I recommend this product:
I will most definitely recommend this product to everyone I know! I am thrilled to be have found the perfect addition to my daughters play kitchen. & best of all my daughter loves her play food!
Related Products I would Recommend:
Until next time,
Friday, September 12, 2014
Flannel Board/ Felt Board
Earlier this week, I crossed off another wonderful Pinterest project off of my giant to-do list!
So here it is...

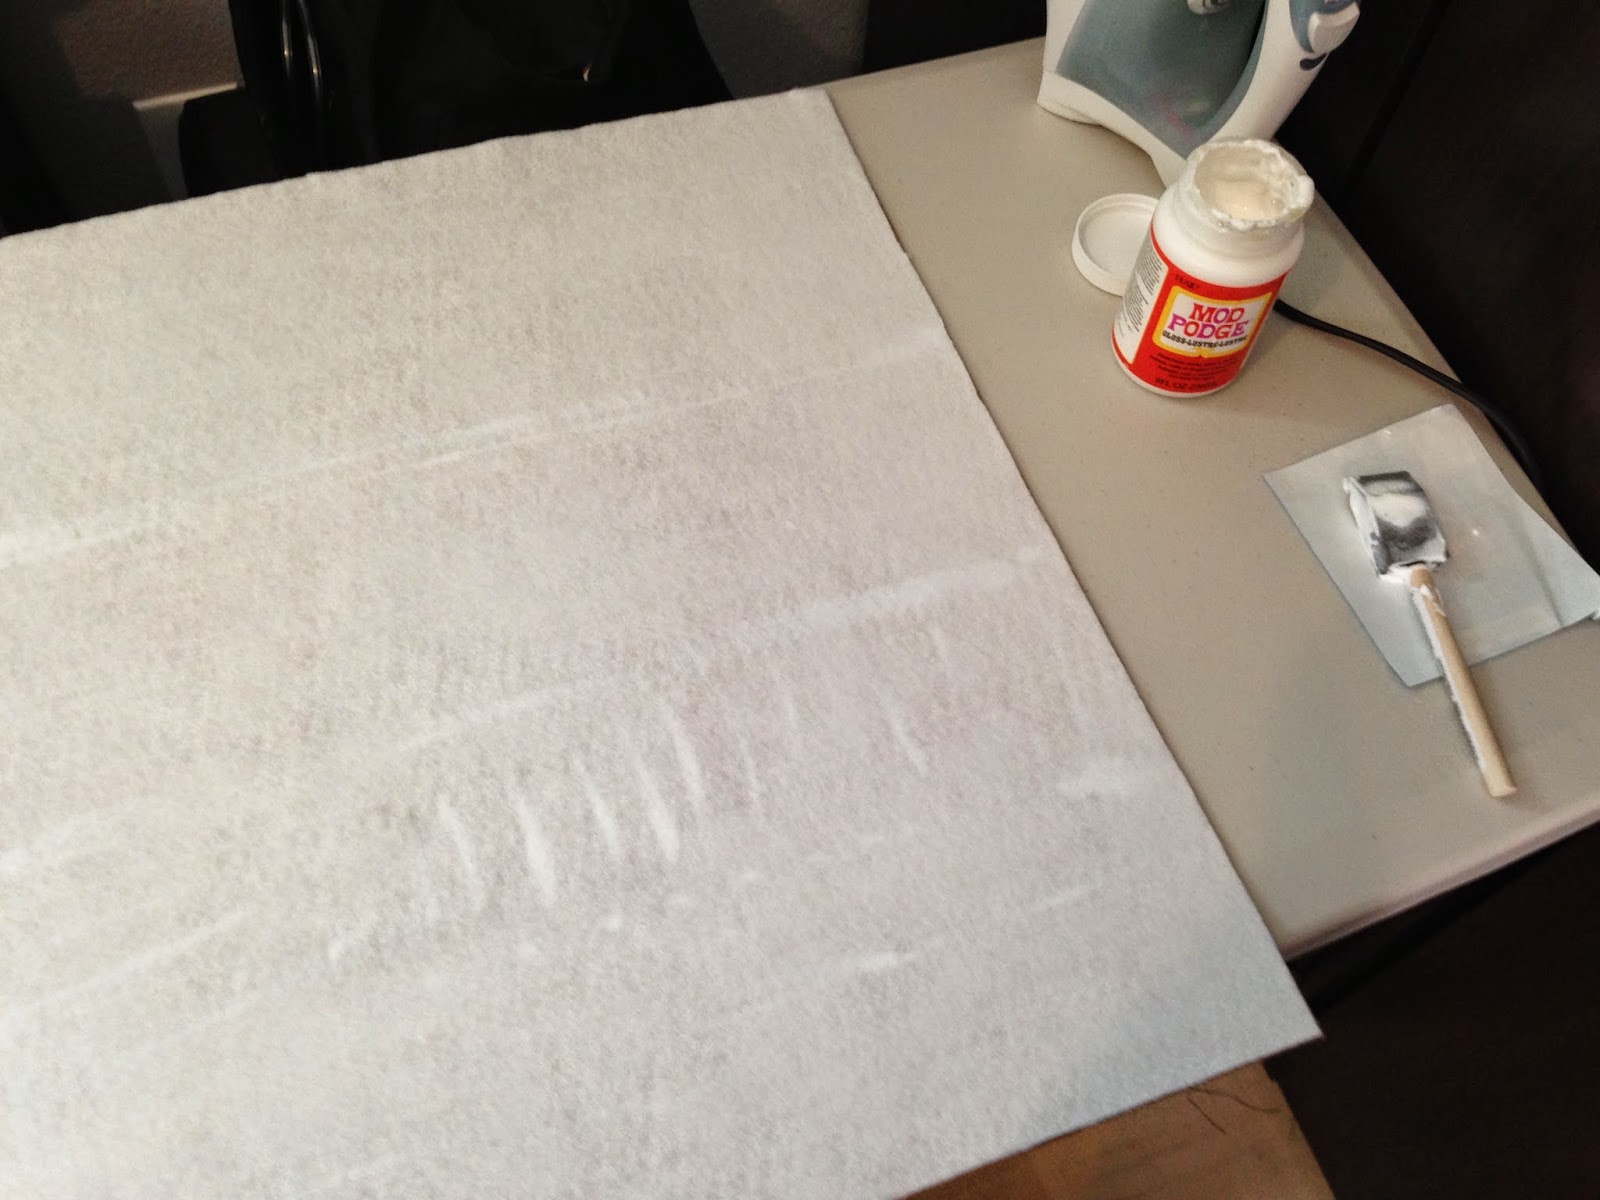
DIY Felt Board
My favorite part about this project is that it only takes about 15 minutes to make:)!
Materials:
- $8 frame from Ikea
- $3 white felt from any craft store.
- Mod Podge and sponge
- Sharp scissors
Optional: iron


Write a comment below if you would like me to post detailed instructions:).
Flannel Story Templates Coming Soon!
Good night,
Saturday, September 6, 2014
Young Maestro Baby Shaker Review (Baby's favorite!)
I'll be writing a few reviews every now and then.
Most reviews will be on toys for infants/toddlers.
The first toy review I'll be doing will be on these lovely shakers.
Product Logistics:
They are called Young Maestro Baby Shakers and they come in a set of 4! The average price for this set is $29.99 and they can be found at Target, ToysRus & amazon.com (along with many other department stores).They are a little longer than 5 inches and about 2 inches wide. (The product description online says differently.)
 |
| Young Maestro Baby Shaker (Set of 4) |
When & why I made this purchase:
I purchased these shakers a month or two before my daughter was born (September/October 2013).
I initially made this purchase because I was looking for rattles and these shakers were the closest thing to what I was looking for.
At the time of the purchase I was a pre-school teacher. As a pre-school teacher I learned so much about what toys are best for each age group and what toys I like best.
What we DO like about this purchase:
So far, we really like these shakers.
Each shaker makes a different sound. They are all easy for a toddler to handle. Eliana's favorites are the red and blue shakers but she uses all 4. She's been using them ever since she began grasping onto things. In fact, we always have to carry at least one of these with us because they are Eliana's favorite!
 |
| Eliana (10 months old) with her shakers. |
It's nice that each shaker is a different color & that they are easy to clean (I wipe them with a damp cloth or quickly run them under water).
What we DON'T like about this purchase:
First, I don't remember these being $30. I'm pretty sure the most I would have ever purchased these for would be $20 so the price must have gone up or I got a some kind of discount. Anyways, before purchasing these, I would research where you could buy them for the best price.
Would I recommend this product:
Yes, in fact I would. They are the perfect addition to any playroom.
Happy shopping,
Party Planning Continued
Baby's Pink & Gold Birthday Party!
I absolutely love the color pink so I couldn't resist but to choose a pink and gold theme for baby's first birthday (& luckily my husband doesn't mind). I quickly put together two vision boards but ideas are still rolling in thanks to Pinterest! For more links check out my Pinterest page here.
Check out the close up of those cupcakes in the 1st image! Yum! & I love the pompoms and banner! I would add a little gold and maybe something similar to image 15 to the background.
2, 5, & 11 are all from the same website. I'll definitely be making letters like the ones in image 5 & 11. Such a great idea!
Those ribbon cookies in image 3 are sooo pretty! & the ombre cake is gorgeous!
The vase in image 4 would make a cute centerpiece. I'd probably choose a vase with a larger opening to add more flowers. If you click on the link, check out the high chair.
Cake pops in image 7 are from a Valentines Day inspired party. I'll have to look for star shaped cake pops!
The cake in image 9 is so beautiful! Click on the link for the recipe.
I couldn't find a link for image 12 but i did find a blog with instructions on how to make some!
Image 14 can be found here.
Cake pops in image 16 and image 18 can be found on the same website.
Party favors in image 22 are perfect! Click on the link for a tutorial! (The mini tiaras can be found at Party City-- $11.99 for 48 tiaras.
The party garland in image 24 can be found at The Land of Nod for $9.95.
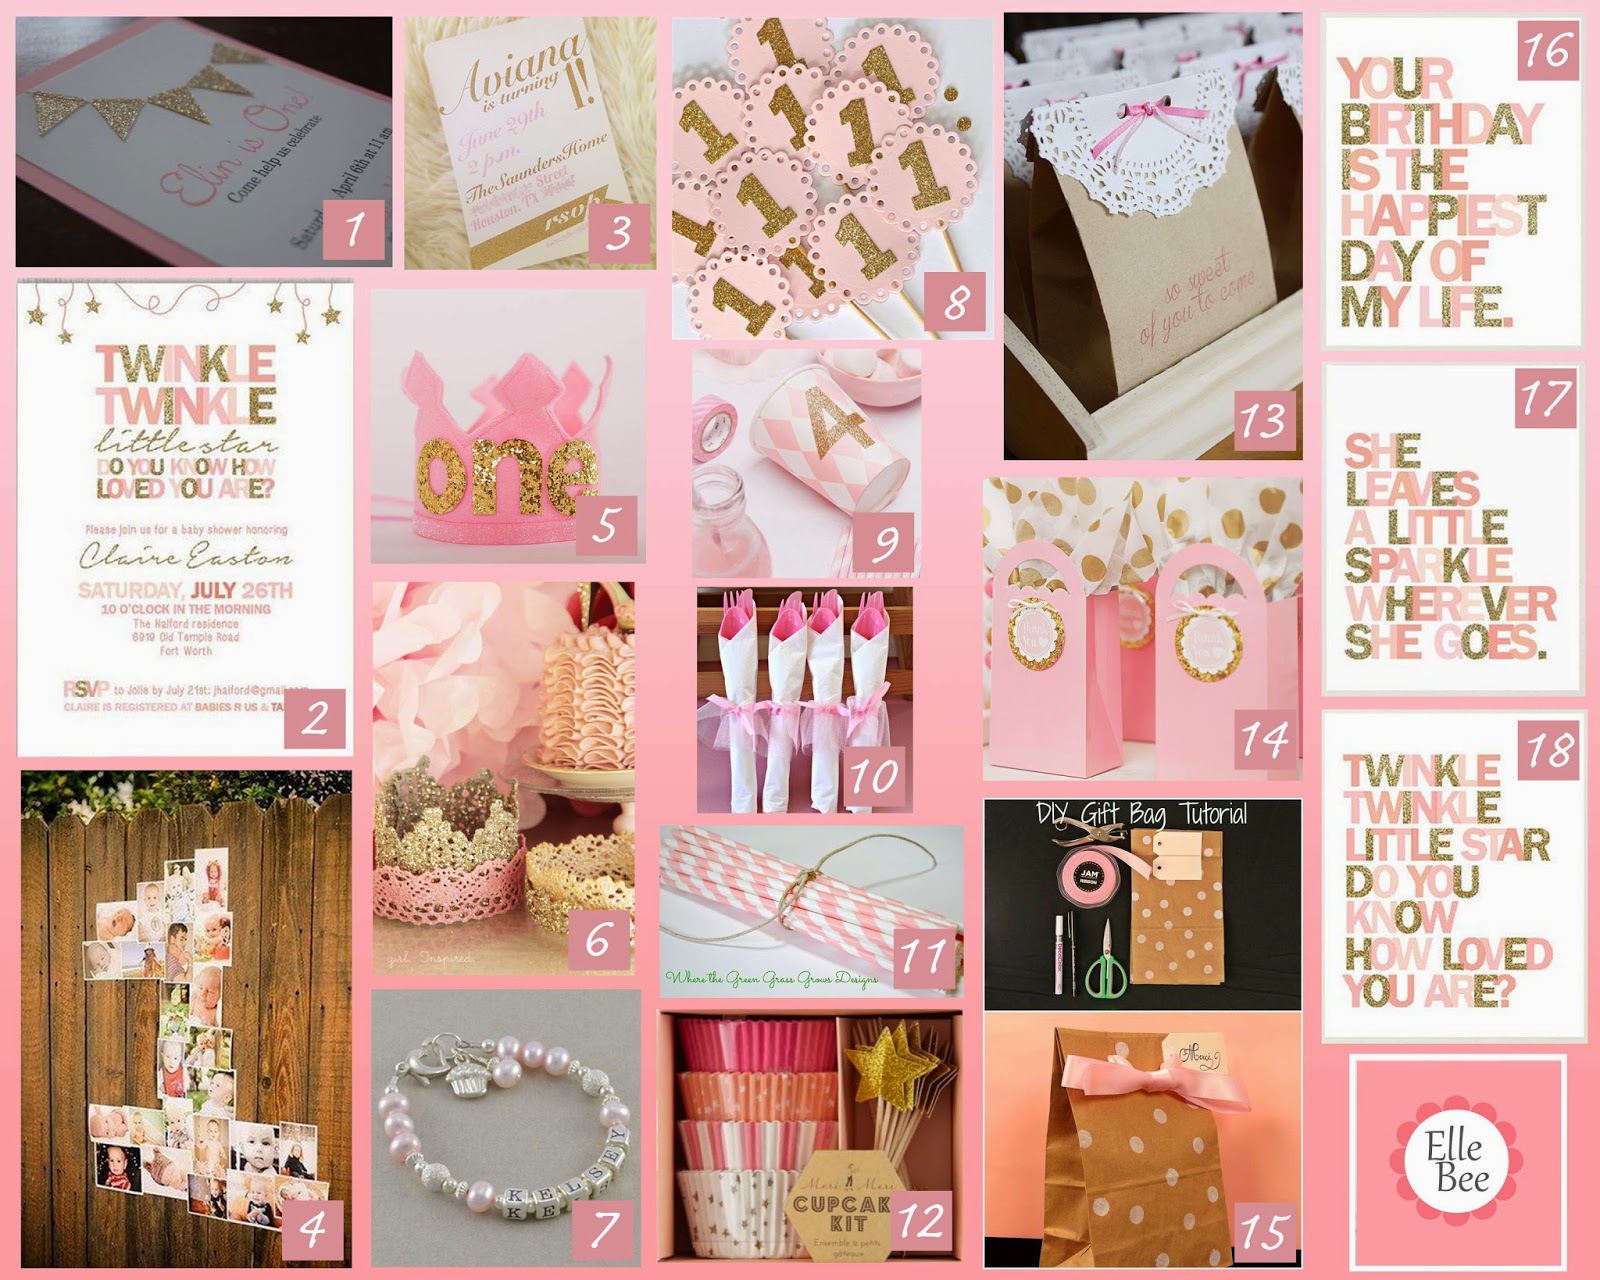
I love the invitations shown in images 1 & 2. The first one is no longer available on Etsy :( but the second one can be found here at the Prettiest Print Shop. The second invitation is meant for a baby shower but I still love it. You can also find images 16,17, & 18 here at the same Etsy store. While browsing the store I also found a twinkle twinkle birthday invitation card!
(Here's another invitation I found.)
Check out this birthday crown!! I wonder how difficult it would be to make it...
DIY directions for the birthday crown in image 6, can be found here.
Find out how to make your own party cups with glitter tape here.
The cupcake kit in image 12 can be found The Land of Nod, here.
Learn how to make favor bags like the ones in image 13 here and ones in image 15 here.
Stay tuned,
Friday, September 5, 2014
Pink and Gold Birthday Board 1
So many ideas, so little time...
Baby's first birthday is only 2 months away...
So, its time to start planning!!
This is 1 of 2 vision boards that I made last night.
I'll post the second board and links to all of these inspiring photos soon.

Bye for now,
Wednesday, September 3, 2014
Enchiladas Rojas
So, I've been craving Enchiladas Rojas (Red Enchiladas) for the past few days
(okay, okay... enchiladas are always on my mind).
Especially these ones...

But anyways, I finally headed to the store last night for cheese and tortillas.
(I had everything else on hand.)
and I got to cooking early this morning.
Because I'm working around baby's set schedule I ended up splitting up tasks.
This morning I prepped the chicken by boiling it and shredding it and placed the enchilada sauce in the fridge to thaw [Enchilada Sauce Recipe: Coming Soon].
While Amalia was napping I diced the tomatoes and onions, and shredded the cheese.
and right before dinner I put everything together.
& it was absolutely delicious!
Feel free to try out this family recipe and let me know what you think!
(Pairs well with spanish rice...)
Enchiladas Rojas
Ingredients:
1.5 lb shredded chicken breast
2 medium roma tomatoes
½ medium yellow onion
1 clove garlic
1 cup shredded monterey jack cheese
16 corn tortillas
2 cups enchilada sauce
2 cups chicken broth
Directions:
1. Place chicken in a pot large enough to fit all pieces without
overlapping. Add enough water to cover chicken. Add 1tbs salt, 1/4 onion and 1
clove garlic to water. Bring to boil, and then reduce heat. Simmer until cooked
(15-20 minutes).
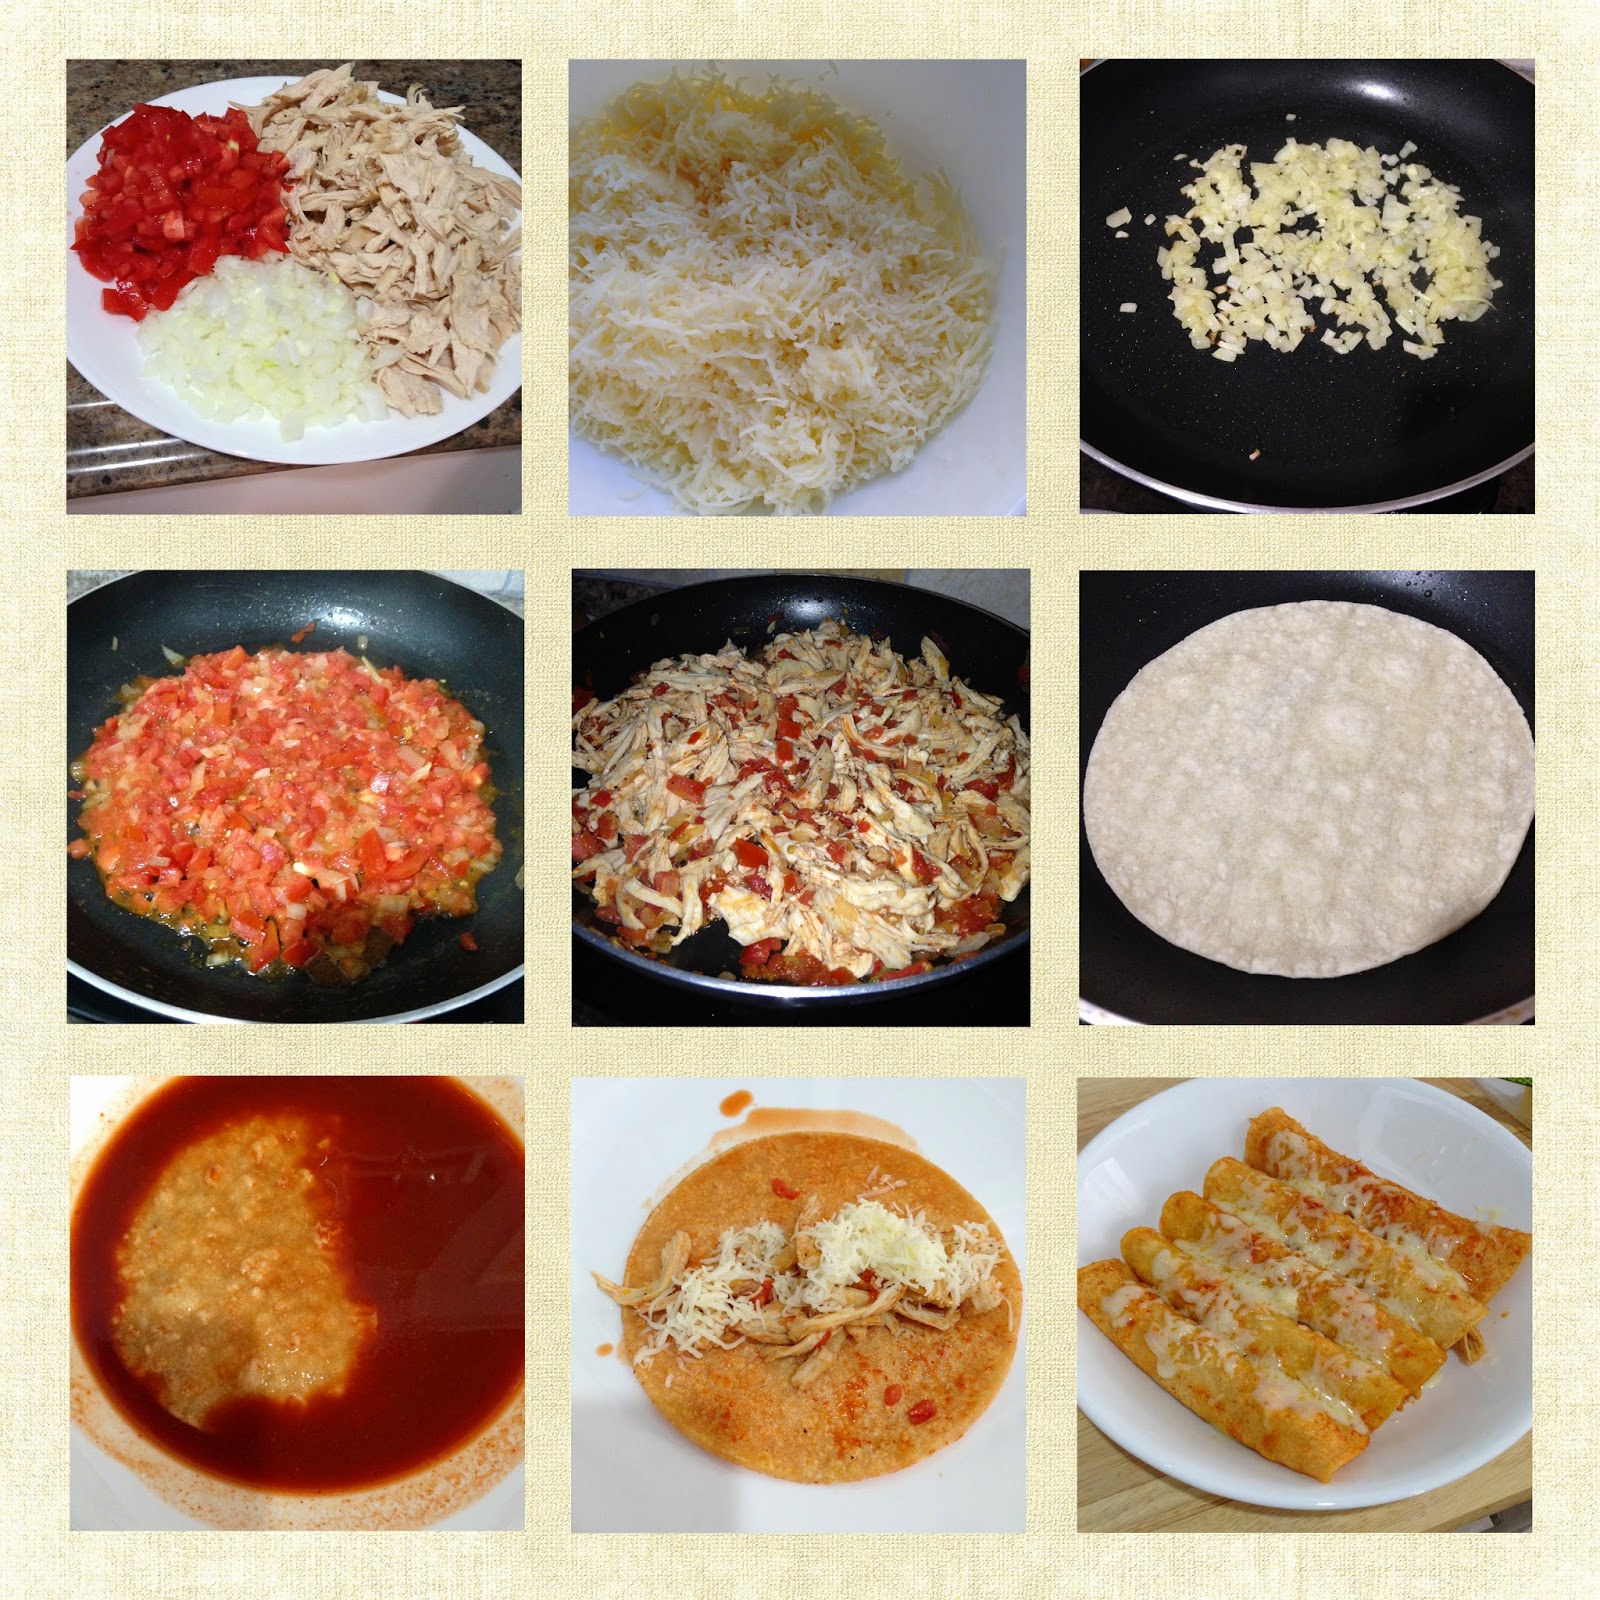
2. While chicken is boiling, chop ¼ onion and 2 medium tomatoes.
3. Once chicken is done, set chicken aside to cool until easy
to handle. Discard
any vegetables from the liquid and reserve about 2 cups broth.
4. Using your fingers (or two forks) shred chicken.
5. In a large frying pan, heat 2 tbs oil. Add chopped
onion and sauté for about 2-3 minutes until translucent. Once onion is
translucent, mix in diced tomato and continue to sauté for 2-3 minutes. Add 2
cups reserved chicken broth and shredded chicken. Stir and simmer for about 10
minutes. Add Lawry’s seasoning salt and pepper to taste. Remove from heat when
done.
6. In small frying pan heat a tablespoon of oil. When oil
is hot, add a tortilla and cook for a few seconds on each side until softened.
Set tortilla aside and repeat until all tortillas are cooked.
7. Place enchilada sauce in a
medium dish large enough to fit the circumference of a tortilla.
8. One by one, dip each
tortilla in sauce, then add 2tbs chicken mixture and 1 tbs shredded cheese to
each tortilla, then roll. Lightly cover rolled enchiladas with shredded cheese.
9. Place in oven at 350
degrees F, for about 5-10 minutes until cheese is melted.
10. Enjoy!
Print out this recipe card for easy viewing...

*Note: Recipe Card is slightly different from the recipe I posted, in that it skips chicken preparation.*
From our kitchen to yours, ¡buen provecho!
hasta luego,
Elle Bee
Tuesday, September 2, 2014
Baby Daily Tracking Sheet
Okay, so I like to be organized and sometimes I may overdo it.
When Eliana was born we needed a way to track all of her meals/diapers/etc.
Thats where my chart making skills came in.


Thats where my chart making skills came in.
Above is the chart we used for my daughter "Tiny Bit," for well over 4 months.
For the first few months it was a lifesaver.
I am a breastfeeding mom so this chart caters to that.
(I can easily edit it for anyone who wants a formula only template.)
Below is an example of how to fill it out.
You can easily print it out, laminate it and use thin whiteboard markers to fill it out. :)
Below is free template for you to use:).
Tata for now,
Elle Bee
New Beginnings
For the past few weeks/days/nights all I could think of are the many projects I would like to actually start/work on/complete.
So after falling asleep shortly after 2am this morning, I woke up and decided it was time to make a list of all the projects I would like to get done.
Two of the projects I am currently working on:
- Updating Tiny Bit's Playroom
- Planning Eliana's 1st Birthday Party
Cheers to new beginnings,
Elle Bee
Subscribe to:
Posts (Atom)